Site Reliability Engineer, currently at GitLab. All content and views are my own.
Software Developer by trade. Based in Auckland.
Cat person 😺 Father 👨👩👧, cyclist 🚲, Kiwi 🇳🇿.
When running any site on the internet, it will be scanned regularly by various scripts. This is true for everything I've hosted, from a cat charity blog to financial software sites. It's not personal.
Rate limiting is a rudimentary line of defence against scanners, brute force attempts, SYN floods, and basic Denial of Service (DoS) attacks. Do not put all your faith into rate limiting, but it is a useful tool to whack on in most circumstances.
When to use iptables
There are lots of different places where you can rate limit. I've often run into a scenario where I need to run a single-instance site without putting extra infrastructure around it. There could be cost or other restrictions in play.
It could even be a third-party app you're running that you cannot easily modify. This is where knowledge of iptables is beneficial.
Background on iptables
I have done an introduction to iptables and connection tracking in an earlier post, and this post will assume a basic understanding of what iptables are.
Target state
I will use Docker for this example, as Docker port forwarding creates a few interesting steps. But you can use any web service with iptables.
If you're not on Docker, you will use the INPUT chain instead of FORWARD. The rest of the principles are the same.
Docker's default bridge networking is an extra layer inside your host. The outside traffic is forwarded to the internal Docker network. When the traffic wants to get out of Docker, it is forwarded out of this network.
What we want to get to in terms of iptables is illustrated in this diagram below:
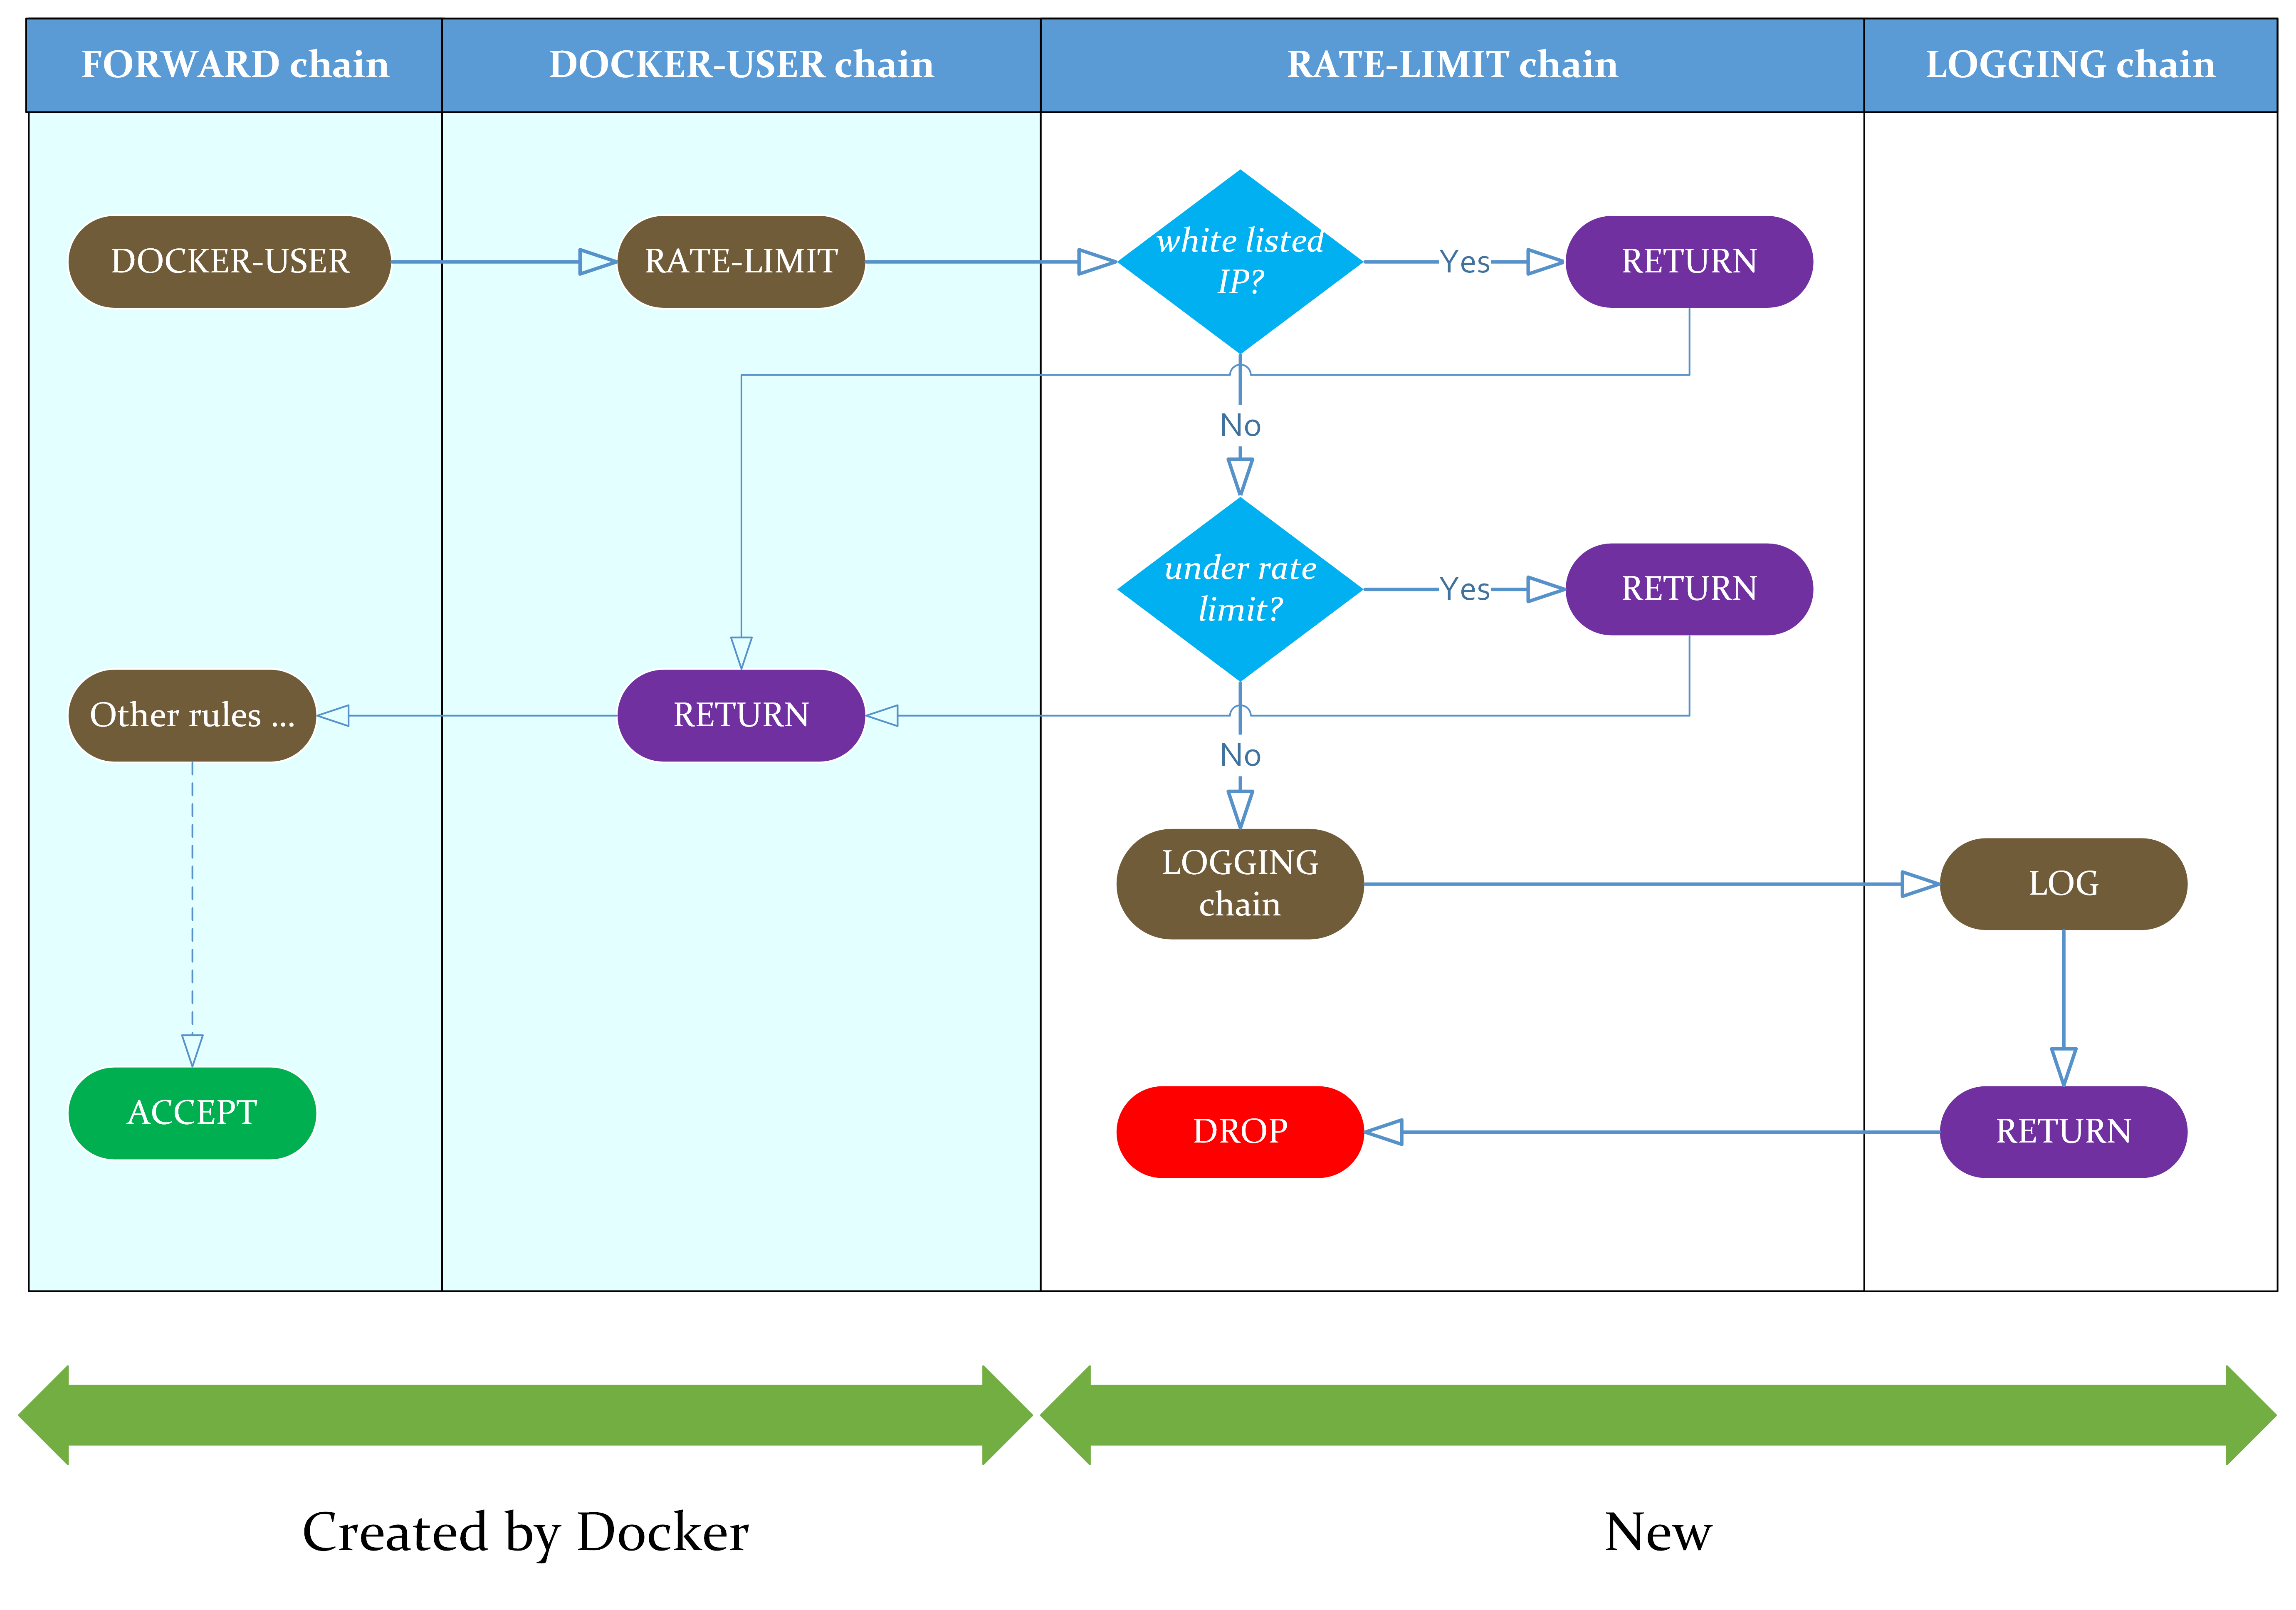
Docker's default bridge networking will configure the FORWARD and DOCKER-USER chains for us. Then we will plug our rate limit solution into that.
FORWARD chain
The FORWARD chain is when your host works as a proxy, forwarding the traffic it has received to somewhere else. In the context of Docker, this is when the traffic is forwarded to the internal bridge network.
DOCKER-USER chain
The Docker daemon configures this as the first rule in the FORWARD chain. By default, it is empty. When you add your own rules into this chain, they get evaluated before traffic to the Docker network.
Set up
1. Create a RATE-LIMIT chain
Follow the basic set up steps for iptables if you don't already have them configured.
Add new chains called RATE-LIMIT and LOGGING (or any other name you think is most appropriate):
sudo iptables --new-chain RATE-LIMIT
sudo iptables --new-chain LOGGING
sudo iptables -L -n # view all the rules
This should give you a list of rules ending with the new empty chain:
Chain LOGGING (0 references)
target     prot opt source               destination

Chain RATE-LIMIT (0 references)
target     prot opt source               destination
2. Docker
If you don't already have Docker setup, follow the official instructions. Also, look at the post-install steps to give your user Docker access if you don't want to use sudo.
To run a hello-world with Docker, I use this:
docker run -d -p 8080:80 nginx:latest

# Test it
curl localhost:8080
The last step will print a welcome page HTML.
3. Set the ratelimit
The rate limit can be implemented using the hashlimit module. There is also a recent module that could be used to accomplish a similar result.
For this example, we set quite an aggressive limit to demonstrate this feature:
sudo iptables -A RATE-LIMIT --match hashlimit --hashlimit-mode srcip --hashlimit-upto 10/min --hashlimit-name per_ip_conn_rate_limit  --jump RETURN
sudo iptables -A RATE-LIMIT -j LOGGING
sudo iptables -A RATE-LIMIT -j DROP
Explanation:
Adding a rule to the end of the RATE-LIMIT chain 2.
--hashlimit-upto 10/minMatch if the IP has made fewer than ten requests per minute 3.-hashlimit-name per_ip_conn_rate_limituse the IP to group connections together (other options include source / dest ports).If the number of requests is under the specified limit,
RETURNto the previous chain 5. If the number of requests exceeds the specified limit, the rule does not match.LOGthe offending request.After the log, we will
DROPthe offending request
Logging is optional but recommended – you want to see who is probing you and when.
4. Configure the log
sudo iptables -A LOGGING -m limit --limit 5/s -j LOG --log-prefix "iptables-throttled: " --log-level info
sudo iptables -A LOGGING -j RETURN
This will write to your system log, usually /var/log/messages or /var/log/system, with the prefix iptables-throttled. No more than five times per second to avoid swamping your storage.
More on the logic behind this in the earlier post
5a. Link the tables to FORWARD / DOCKER-USER
If you've used Docker, you'll link this to the FORWARD chain (see the example below). The FORWARD chain, when configured by Docker, will have the first rule that goes to DOCKER-USER like so:
Chain FORWARD (policy DROP)
target     prot opt source               destination
DOCKER-USER  all  --  0.0.0.0/0            0.0.0.0/0

...

Chain DOCKER-USER (1 references)
target     prot opt source               destination
RETURN     all  --  0.0.0.0/0            0.0.0.0/0
You can add your new chains to DOCKER-USER, and these will be evaluated before any other Docker-related rules. So add your rate limit here:
sudo iptables -I DOCKER-USER 1 --jump RATE-LIMIT
Your sudo iptables -L -n should now end with something like this:
Chain DOCKER-USER (1 references)
target     prot opt source               destination
RATE-LIMIT  all  --  0.0.0.0/0            0.0.0.0/0
RETURN     all  --  0.0.0.0/0            0.0.0.0/0

Chain LOGGING (1 references)
target     prot opt source               destination
LOG        all  --  0.0.0.0/0            0.0.0.0/0            limit: avg 5/sec burst 5 LOG flags 0 level 6 prefix "iptables-throttled: "
RETURN     all  --  0.0.0.0/0            0.0.0.0/0

Chain RATE-LIMIT (1 references)
target     prot opt source               destination
RETURN     all  --  0.0.0.0/0            0.0.0.0/0            limit: up to 5/sec burst 4 mode srcip htable-expire 60000
LOGGING    all  --  0.0.0.0/0            0.0.0.0/0
DROP       all  --  0.0.0.0/0            0.0.0.0/0
5b. Link the tables to INPUT
If you're not using Docker, then add this RATE-LIMIT chain to the top of your INPUT chain instead. I'll leave that as an exercise to experiment with, but it builds on all the same principles.
6. Extra: Whitelisting IPs / CIDR ranges
If you want some IPs or CIDR ranges to bypass the rate limit, add some RETURN rules to the top of your RATE-LIMIT chain.
Docker networks have IP ranges, and you would typically not want Docker containers that talk to each other to be rate limited like you limit external traffic.
You can get their IP ranges with docker network ls and then docker inspect <network_name>, and look under Subnet.
For example, if you're only using the default bridge network, it is called bridge, and you can get its IP range by calling docker inspect bridge | grep Subnet. If this is 172.17.0.0/16, then you can add the exception:
sudo iptables -I RATE-LIMIT 1 --source "172.17.0.0/16" -j RETURN
7. Test
Make sure that your host is open to remote connections on port 8080. Then run a script from a different machine on a loop hitting your open port and see if it gets limited.
IP="<replace with your host's URL or IP>"
i=1
while true; do
  curl -sS --connect-timeout 2 "$IP:8080" >/dev/null
  echo "Attempt $i got exit code $?"
   i=$((i+1))
done
You should see connection timeouts after a short time, and the remote host's system log (e.g. /var/log/messages) should contain your logs with the iptables-throttled prefix.
When you tail -f /var/log/messages, you should see lines that look like this:
May 20 08:29:57 helloworld kernel: [597429.154452] iptables-throttled: IN=ens5 OUT=docker0 MAC=12:34:56:78:9A:BC:12:34:56:78:9A:BC:08:00 SRC=123.456.789.1 DST=172.17.0.2 LEN=133 TOS=0x00 PREC=0x00 TTL=44 ID=0 DF PROTO=TCP SPT=54980 DPT=80 WINDOW=2052 RES=0x00 ACK PSH URGP=0
Note that the DST address is your Docker container's IP address on your internal network, not your host's IP address. Also, see the ACK PSH messages in the example above – these are parts of the TCP protocol.
The rate limit and log messages are based on the components of the TCP protocol, not on each HTTP request.
Extension: Persistence
As I described in detail in my first article on iptables – iptables do not persist across reboot by default.
The Docker daemon dockerd will recreate its own networking and rules when the container restarts, but your additions to DOCKER-USER will not stick.
To make them persist, there are several approaches you can take:
Use the
iptables-persistentmodule to save the state and load it on boot (see my first article on iptables).With docker this gets more complicated. You must prevent the Docker daemon from adding further
iptablesrules. Otherwise, they can clash with your changes. You can do that by setting the keyiptablestofalsein/etc/docker/daemon.jsonDrawback is that you must persist all the tables generated by the Docker daemon and any other service on your host. Not just your additions.
Add the above rules into a script that runs after the Docker daemon is started.
Option 2 is summarised below.
Option 2 – Persistence with systemd
You can follow this example if your Linux system uses systemd to manage services (default on most distros). We will wait for the Docker daemon service to start, create its own rules, and then attach our rules.
With sudo, create a file /opt/configure-iptables-ratelimit.sh and paste all of the commands you executed above into it.
#!/bin/sh
set -e
sudo chmod +x /opt/configure-iptables-ratelimit.sh
Create a file /etc/systemd/system/iptables-ratelimit.service, and paste the following into it (with sudo):
[Unit]
Description=Configure rate limiting with iptables
After=docker.service

[Service]
Type=oneshot
ExecStart=/opt/configure-iptables-ratelimit.sh

[Install]
WantedBy=multi-user.target
If you have other services that modify iptables, add them to the After= clause in your systemd config. If you're not using docker, do not add the After line.
Enable the service on boot: sudo systemctl enable iptables-ratelimit
Reboot to test the persistence. Remember to start the docker container again (or add a systemd config to start it).